DB2 INFORMATION
Connection to DB2 Database Server is available from the Windows Lab. You can connect to the DB2 server using Data Studio, a client tool for DB2. The Data Studio is installed on every machine. DB2 server can be accessed remotely. You will need DB2 client and Datastudio on your personal computer if you are trying to make a remote connection. Click here to download the client and Datastudio.
If you are enrolled in a database course for db2, you will have an account on the DB2 database. DB2 accounts are requested by your professor.
Instructions on how to connect to Java with DB2
Important DB2 Database Server Information:
Host: db2serv01.cs.stonybrook.edu
Port:50000
User Name: The user name assigned to your team <cseteam1 or cseteam2 or cseteam3 etc.>
Database Name: teamdb1 or teamdb2 or teamdb3 (for cseteam1 use teamdb1, for cseteam2 use teamdb2 etc.)You can connect to your database schema as follows:

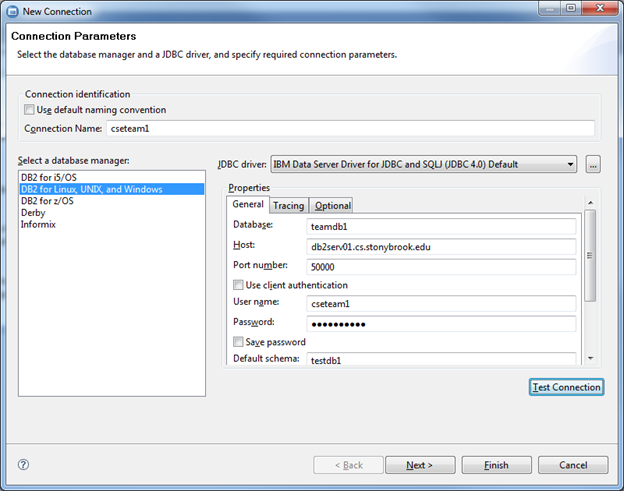

From the desktop, click on the icon for IBM Data Studio. The Task Launcher screen, shown below, will open.
From the launcher screen, click on ‘New’ drop down, and select ‘New Connection Profile’. Connection parameters screen, shown below, will open.
Uncheck the box for “Use Default Naming Convention”, and enter the following parameter values:
Connection Name: Enter a meaning full connection name. For example, the user name assigned to your team <cseteam1 or cseteam2 or cseteam3etc.>
Select a database manager: DB2 for Linux, Unix, and Windows
Database: teamdb1 or teamdb2 or teamdb3 (for cseteam1 use teamdb1, for cseteam2 useteamdb2 etc.)
Host: db2serv01.cs.stonybrook.edu
Port: 50000
User name: The user name assigned to your team <cseteam2 or cseteam3 or cseteam4 etc.>
Password: Will be provided to your team in the class. Please send an RT request to change it.
Default schema: The user name assigned to your team <cseteam1 or cseteam2 or cseteam3 etc.>
Test you connection and then click on NEXT button.
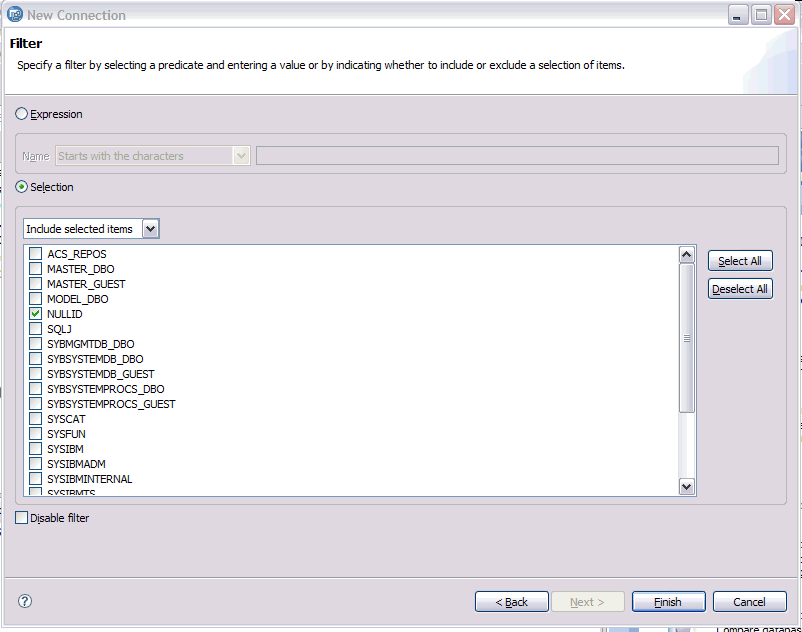
Optional - Uncheck the option "Disable filter" and select the radio button "Selection". To begin with they will choose your user id (e.g. cseteam1) as the default schema and click Finish. If you do not see your user id, then choose NULLID.
You would see their connection as Filtered as shown below:
You can now click on Finish to complete the setup.
To verify that your new connection was created, you will notice your connection appears on left hand side “All Databases” folder in Task Launcher. You may see many other open connections as well.

You can manage your connection by reconnecting or by deleting your existing connection after every use. In the Database Explorer view, right-click on your connection, and select Delete.
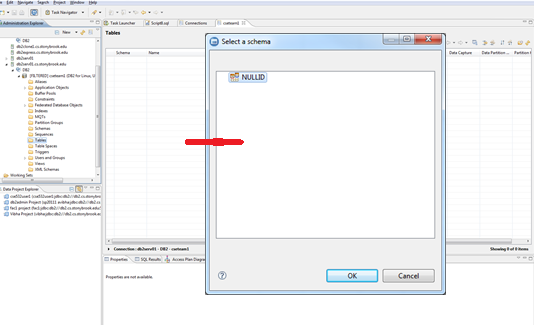
Creating your Schema: After you've finish creating the connection, you may not see your schema when creating a object for the first time. For example, if you create a table, choose NULLID as schema, edit the SQL and change NULLID to you schema name i.e. your NETID, and execute the SQL as shown below:
Change "NULLID" to your schema name i.e. your NETID by previewing the DDL, and opening it using the SQL editor.
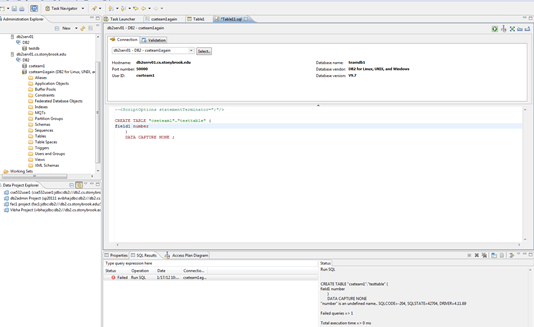
In the SQL editor, there is a RUN button. Click on RUN to execute the DDL
Close out the editors or open windows.
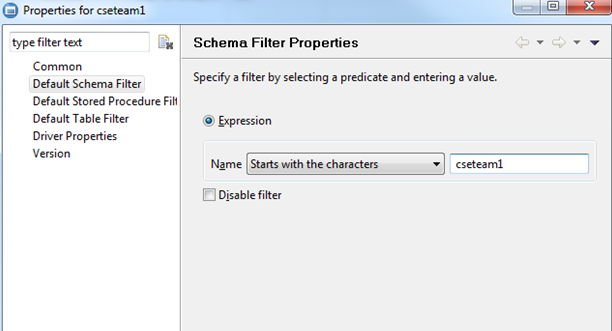
Now you need to change the Schema filter again to see your newly created schema. Right click on the database and choose "Properties" context menu. In the "Properties" choose the option "Expression". And then type in your name as shown below. Please note that the SCHEMA name is case sensitive.
Now refresh the connection and schema. And check the schema folder in Admin explorer and they will find only your name. Now on you can only create objects in your own schema.