How to access my VMware account and install Ubuntu?
Note: VMware lab facilities are for limited use by registered System Administration class students during the semester. If you are registered for a System Administration class, you automatically have access to your own personal virtual machine. To get console access to your VM, you will need to use VMware's own software which comes in two forms:
- A Windows Internet Explorer (IE) plugin
- A VMware vSphere Client tool (which only runs on Windows)
VMware servers (using vsphere client or IE plugin) are accessible from within or outside the campus. Please note that the terminal server already has the vsphere client installed.
Non-windows users will have to go through a remote Windows Terminal Server, which we have setup for you. Below are the instructions specific to your OS platform:
WINDOWS USERS
Window users can use Internet Explorer (IE) plugin or VMware vSphere Client tool to access your virtual machine.
To install VMware vSphere client, follow these steps:
- Using IE (not firefox), go to "esxNsc.cs.sunysb.edu", where N is 1, 2, 3 or 6. The site uses a self-signed certificate, which you will have to accept despite the warnings that various Web browsers may tell you.
- You can then click on "Download vSphere Client" to download and install the VMware remote-access client for Windows; or you could click on "Log in to Web Access" to use an IE login Plugin. Either method would allow you to get to the "vSphere Web Access" login prompt. With both methods, you'll be asked to list your login name and password.
To run VMware vSphere client, follow these steps:
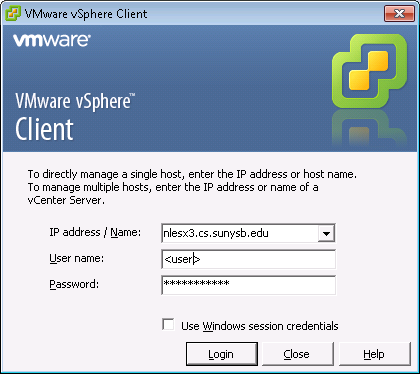
- Launch the vSphere client
- Once you get the login prompt, provide your username and domain as follows:
- user where user is your username (which should match your NetID).
- The vSphere Client will also prompt you for the hostname of the ESX server to connect to. Use:
esxNsc.cs.sunysb.edu, where N is 1,2,3 or 6. You must check with your instructor the host where your virtual machine resides.
If you were successful in logging in, then at this point you will see Vmware vSphere Web Access GUI, and be able to start/stop your VM, snapshot it, launch the remote VM Console Plug-in, and more.
For the first time, there will be no OS on the virtual machine.
- Instructions to install Ubuntu are available here.
- Instructions to re-install Ubuntu using the ISO image are available here.
Note: This remote VM console login only works for Windows IE (and reportedly some older versions of Firefox on Windows).
Other useful links are:
MAC OS X USERS
Non-windows users have to first get to a Windows Terminal Server.
To login to this remote Windows Terminal Server from a Macintosh, Mac OS X users first have to download a Remote Desktop Client for Mac OS X and install it. If RDP for MAC is installed, do the following steps:
- Launch the client, it'll prompt you for a remote host to connect to. Use ts1.cs.stonybrook.edu:22 (on port 22)
- You'll be prompted for your credentials. Provide your username and domain as follows:
- CSuser where user is your CS Windows username (which should match your NetID). You can also specify your login name as user@cs.stonybrook.edu
For your password, provide your CS Windows password, the same one you use to login to read your MS Exchange email, or credentials at the Windows lab.
- CSuser where user is your CS Windows username (which should match your NetID). You can also specify your login name as user@cs.stonybrook.edu
- Once you're able to login to this Windows Terminal Server, there should be an icon on your Terminal Server desktop to launch the vSphere Client. From here, follow the instructions for "Windows Users to run VMware vSphere client" just above.
LINUX USERS
Linux users have to first get to a Windows Terminal Server. You have to install the "rdesktop" client for linux.
Consult your particular distribution to figure out how to do this (e.g., CentOS/RedHat use "yum install rdesktop", Ubuntu users use "apt-get install rdesktop", etc.).
- If the client is installed, export DISPLAY to your local host, and run this from the command line: rdesktop ts1.cs.stonybrook.edu:22 (on port 22)
- If successful, then the "rdesktop" client will connect to the Remote Terminal Server.
- You'll be prompted for your credentials to loginto the Terminal Server, please provide your username and domain as follows:
- CSuser where user is your CS Windows username (which should match your NetID). You can also specify your login name as user@cs.stonybrook.edu
For your password, provide your CS Windows password, the same one you use to login to read your MS Exchange email, or credentials at the Windows lab.
- CSuser where user is your CS Windows username (which should match your NetID). You can also specify your login name as user@cs.stonybrook.edu
- Once you're able to login to this Windows Terminal Server, there should be an icon on your Terminal Server desktop to launch the vSphere Client. From here, follow the instructions for "Windows Users "Windows Users to run VMware vSphere client" just above.
If you get an error "ERROR: Failed to open display", then you have not exported your X11 display, or properly started your X11 server. If you're using a Linux system, then you should know how to X11 (e.g., run "export DISPLAY=localhost:0" before starting any X11 clients).
If you happen to use other operating systems (e.g., FreeBSD), then you'll have to find out on your own how to get a Remote Desktop client that is compatible with Microsoft's RDP protocol.
